Knob-Type Smart Toilet User Manual
Installation, operation, troubleshooting & maintenance guide
CY Series
BSJ Series
TC Series
BSJ Series
TC Series
📦 1. What’s in the Box
| Item | Qty |
|---|---|
| Smart Toilet | ×1 |
| Remote Control | ×1 |
| Wax Ring | ×1 |
| Floor Flange | ×1 |
| Mounting Brackets | ×2 |
| T-Bolts & Washers | ×2 |
| Foam Bottle | ×1 |
| Shut-Off Valve | ×1 |
| Foam Shield Refills (3-pack) | ×1 |
| Mounting Hardware Kit | ×1 |
💡 Check all items before installation. If anything is missing, contact us immediately.
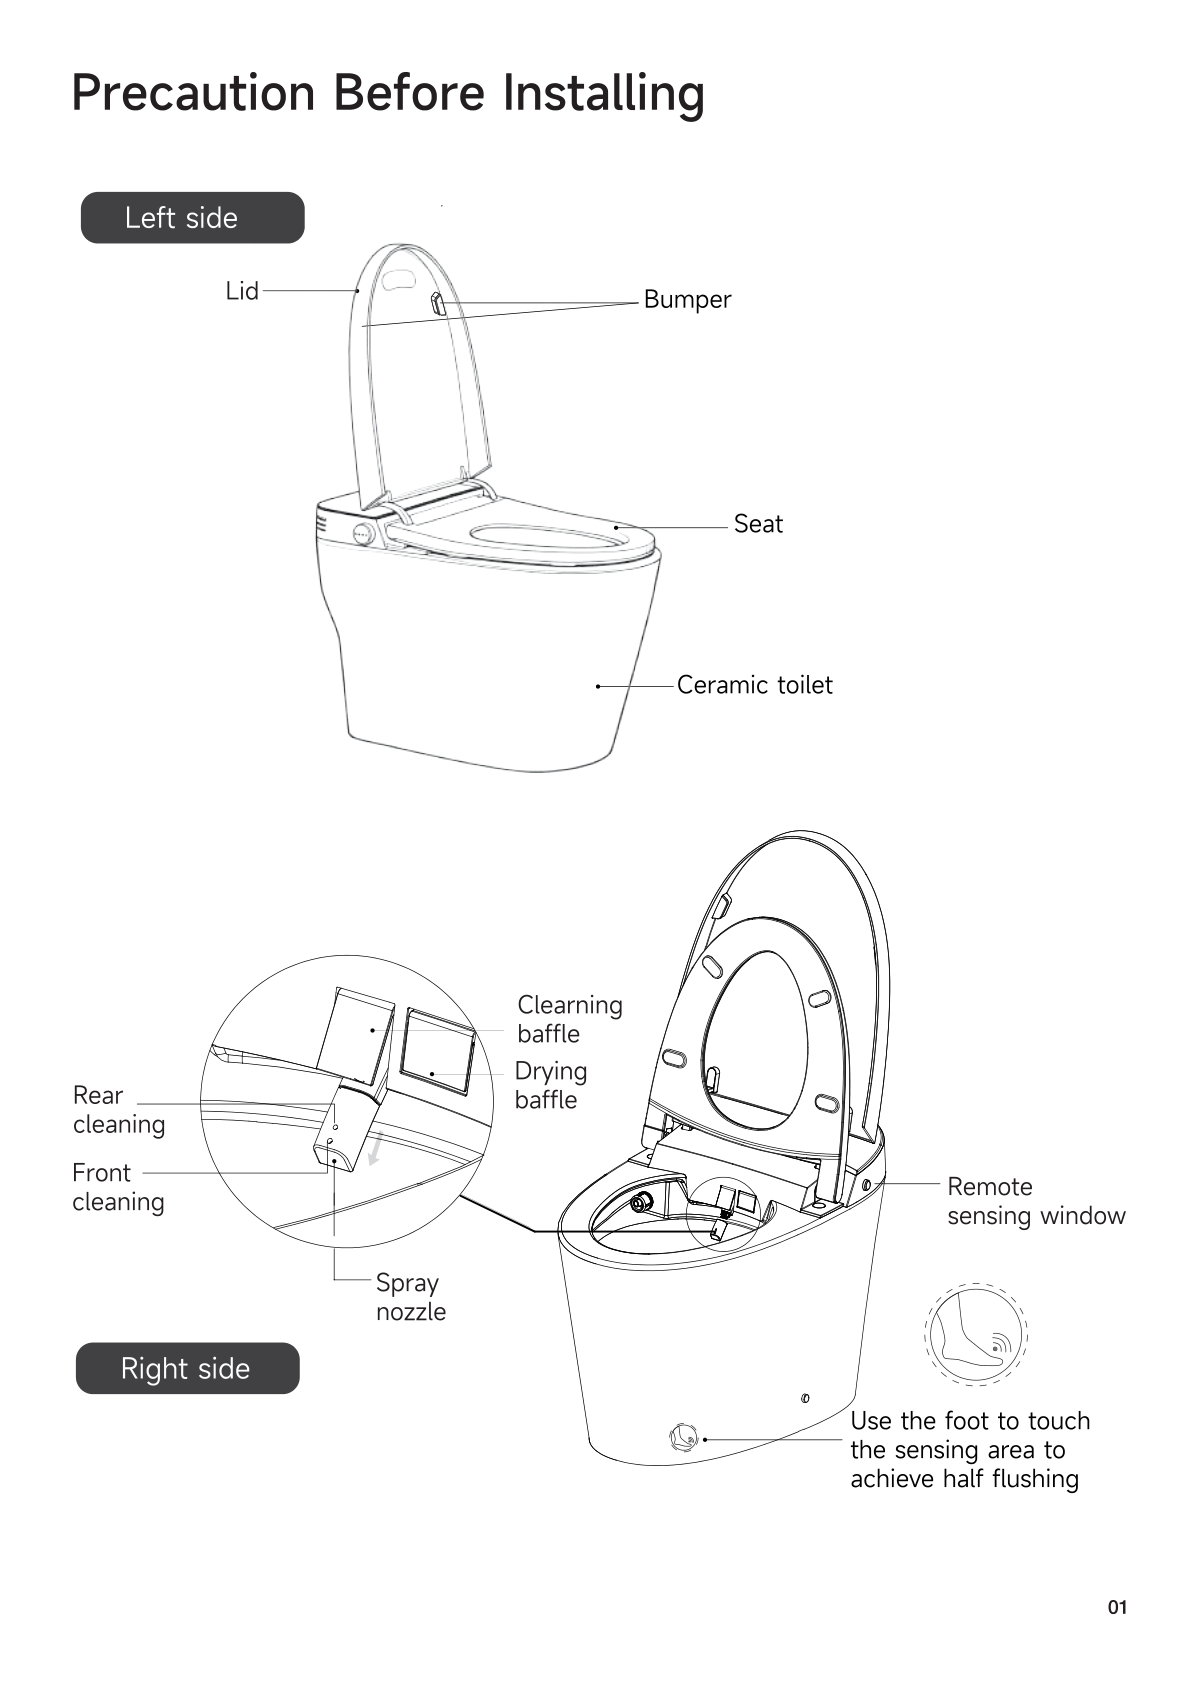
📐 2. Product Parts Diagram
| Part | Location |
|---|---|
| Lid Bumper | Top of toilet |
| Seat | Below lid |
| Ceramic Toilet Bowl | Main body |
| Rear Cleaning Spray Nozzle | Inside bowl, retractable |
| Front Cleaning Spray Nozzle | Inside bowl, retractable |
| Remote Sensing Window | Front of toilet |
| Foot Flush Sensor | Bottom front — tap with foot to flush |
| Side Knob Control | Right side of toilet body |
📊 3. Technical Specifications
| Power | 120 V AC, 60 Hz, 1300 W |
| Flush Type | Siphon Jet Flush |
| Water Usage | 1.28 GPF (gallons per flush) — WaterSense compliant |
| Water Pressure | 22–109 PSI (0.14–0.80 MPa) |
| Heating | Instant (endless hot water) |
| Water Temp Settings | OFF / 93°F / 99°F / 104°F |
| Seat Temp Settings | OFF / 93°F / 99°F / 104°F |
| Air Temp Settings | OFF / 113°F / 122°F / 131°F |
| Fan Speed | >4 m/s |
| Power Cord Length | 1.5 m (4.9 ft) |
| LED Display | Yes — shows temperature and settings |
| Night Light | LED 4.5W |
| Safety | GFCI / Overheat / Fuse protection |
| Bowl Size Requirement | Rough-in ≥ 11.8″ (300 mm) |
💡 1.28 GPF saves ~3,000 gallons of water per year vs older toilets. Meets US WaterSense standards.
🔧 4. Installation
Before You Start
- ✅ Finished wall & floor in bathroom
- ✅ Grounded power outlet nearby
- ✅ Water shut-off valve accessible
- ✅ Drain pipe ready
Tools You’ll Need
- PTFE Thread Seal Tape
- 100% Silicone Sealant + Caulking Gun
- Adjustable Wrench (3/4″)
Water Connection
Three connection options:
- Direct — 1/2″ NPT threaded shut-off valve
- Compression — Use included 5/8″ compression fitting
- Adapter — Use existing 3/8″ valve with adapter
⚠️ IMPORTANT: Connect water supply BEFORE plugging in power. Failure will trigger Error Code E4 and may damage the unit.
Installation Steps
- Turn off water supply. Remove old toilet if replacing.
- Install floor flange & wax ring.
- Secure mounting brackets with T-bolts.
- Place toilet on flange, bolt down evenly.
- Connect water supply line (see diagram above).
- Install foam bottle beside/near toilet.
- Turn on water supply. Check for leaks.
- Plug into GFCI outlet. Wait for self-check.
🛡️ 5. Foam Shield Setup
- Open the foam bottle compartment.
- Drop in 3 foam tablets (≈ 200 uses).
- Fill bottle with tap water.
- Place bottle on the floor next to or behind the toilet.
- Ensure the foam tube is not bent or kinked.
💡 First few uses may produce little foam until tablets fully dissolve. Keep using.
🚽 6. First Use & Flush Methods
Safety
Wash/dry functions only work when seated (safety sensor). This is normal.
Four Ways to Flush
| Method | How |
|---|---|
| Auto Flush | Just stand up — detects you leaving |
| Knob Flush | Press side knob once |
| Foot Kick | Lightly tap the foot sensor area |
| Power Outage | Install backup battery, press knob |
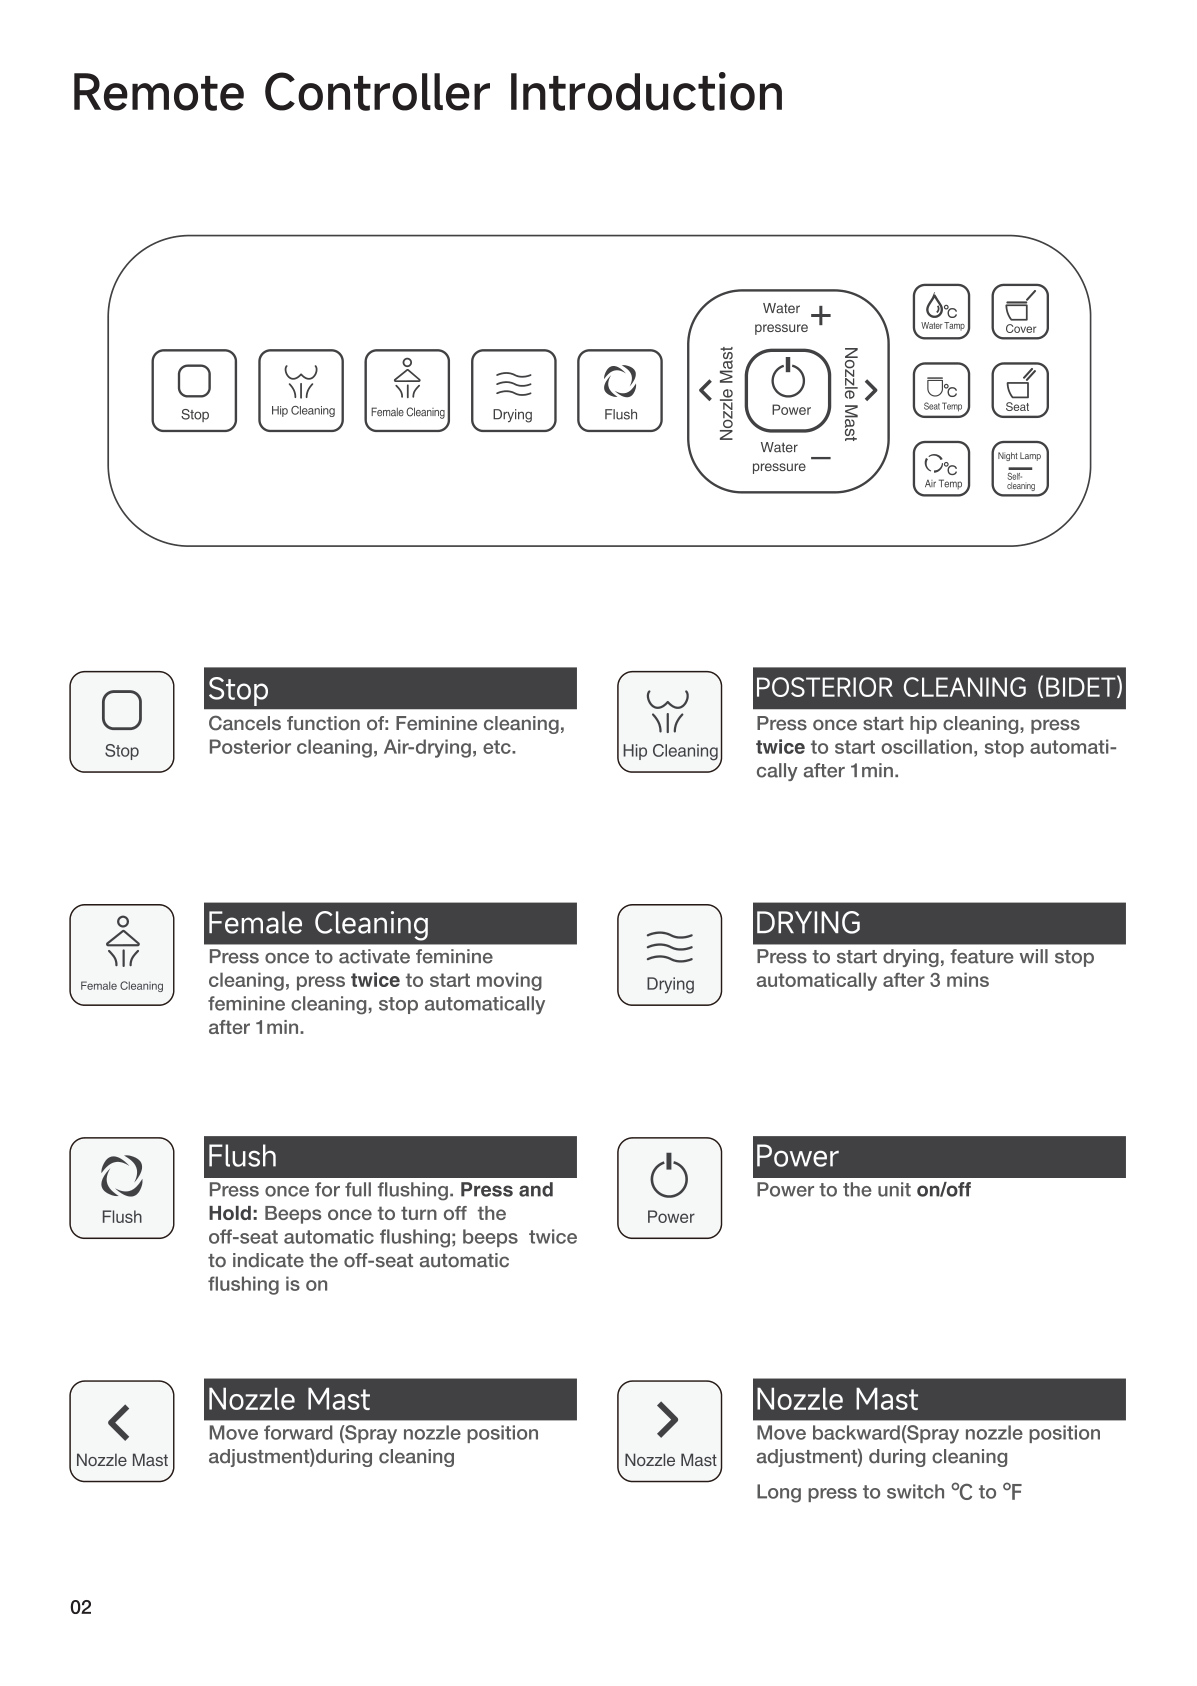
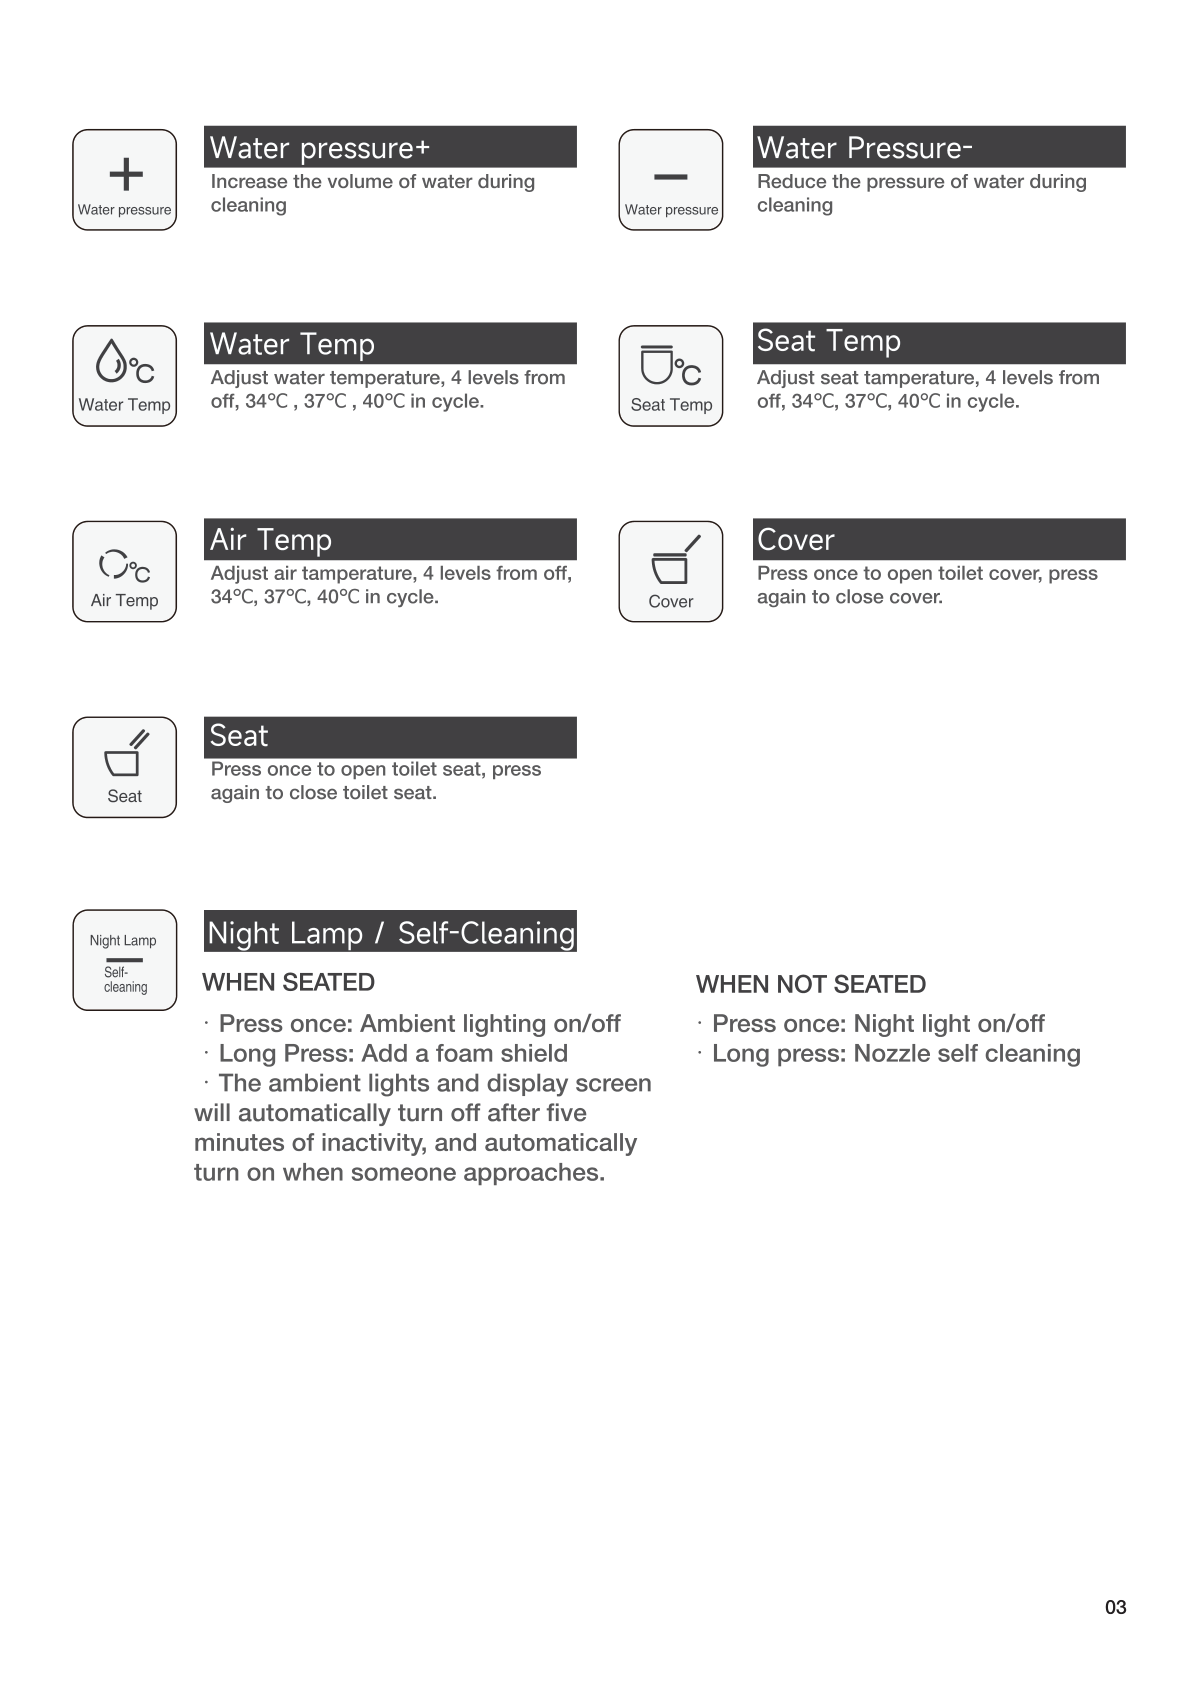
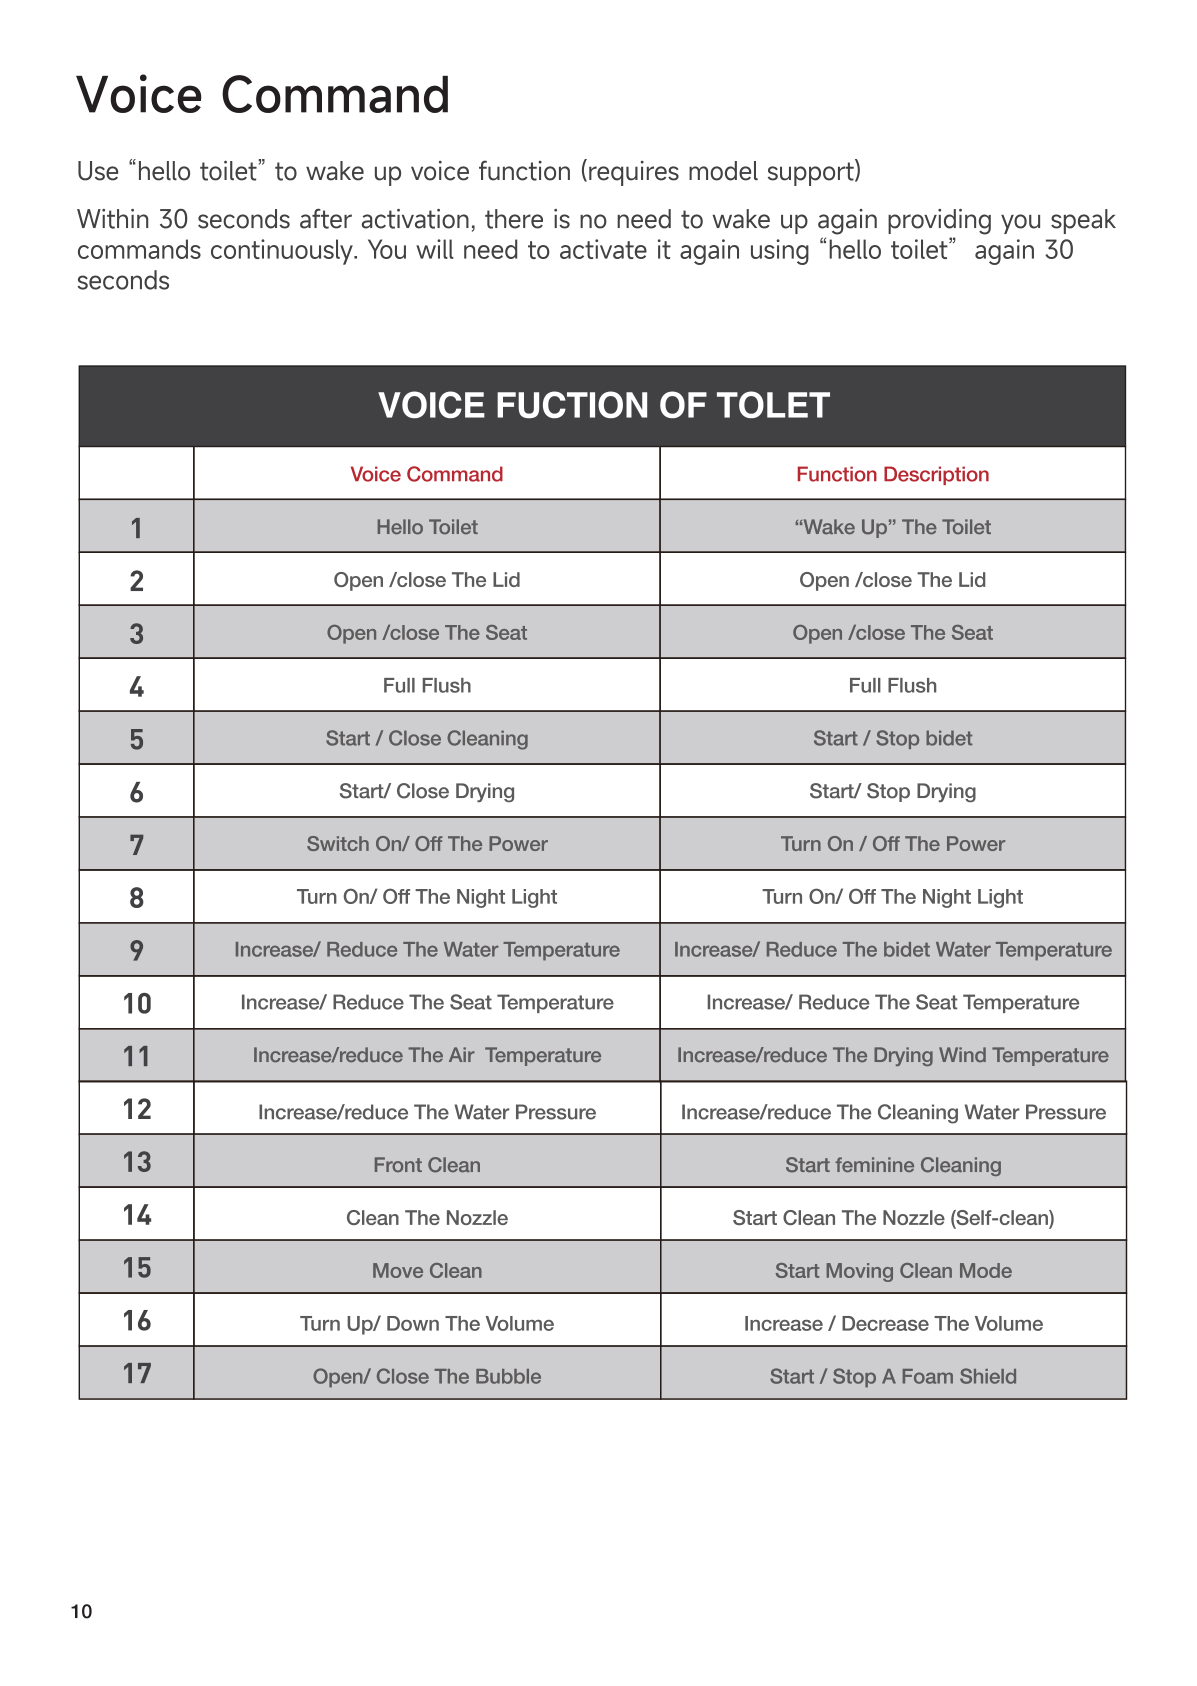
🎮 7. Remote Controller Functions
| Button | Function |
|---|---|
| Stop | Cancels all active functions |
| Rear Wash | Posterior wash. Press again: oscillating mode. |
| Feminine Wash | Front wash. Press again: oscillating mode. |
| Vortex Wash | Swirling wash for thorough cleaning |
| Child Wash | Gentle mode for children |
| Dryer | Warm air drying |
| Full Flush | Full flush (1.28 GPF) |
| Half Flush | Half flush for liquid waste |
| Water Pressure +/- | Adjust water pressure during wash |
| Nozzle Position ← → | Move nozzle forward/backward |
| Water Temp | OFF → 93°F → 99°F → 104°F |
| Seat Temp | OFF → 93°F → 99°F → 104°F |
| Air Temp | OFF → 113°F → 122°F → 131°F |
| Lid / Seat | Press: open lid/seat. Press again: close. |
| Bubble Shield | Toggle foam shield on/off |
| Night Light | Toggle LED night light |
| Nozzle Self-Clean | Manual nozzle cleaning |
| ECO | Energy-saving mode |
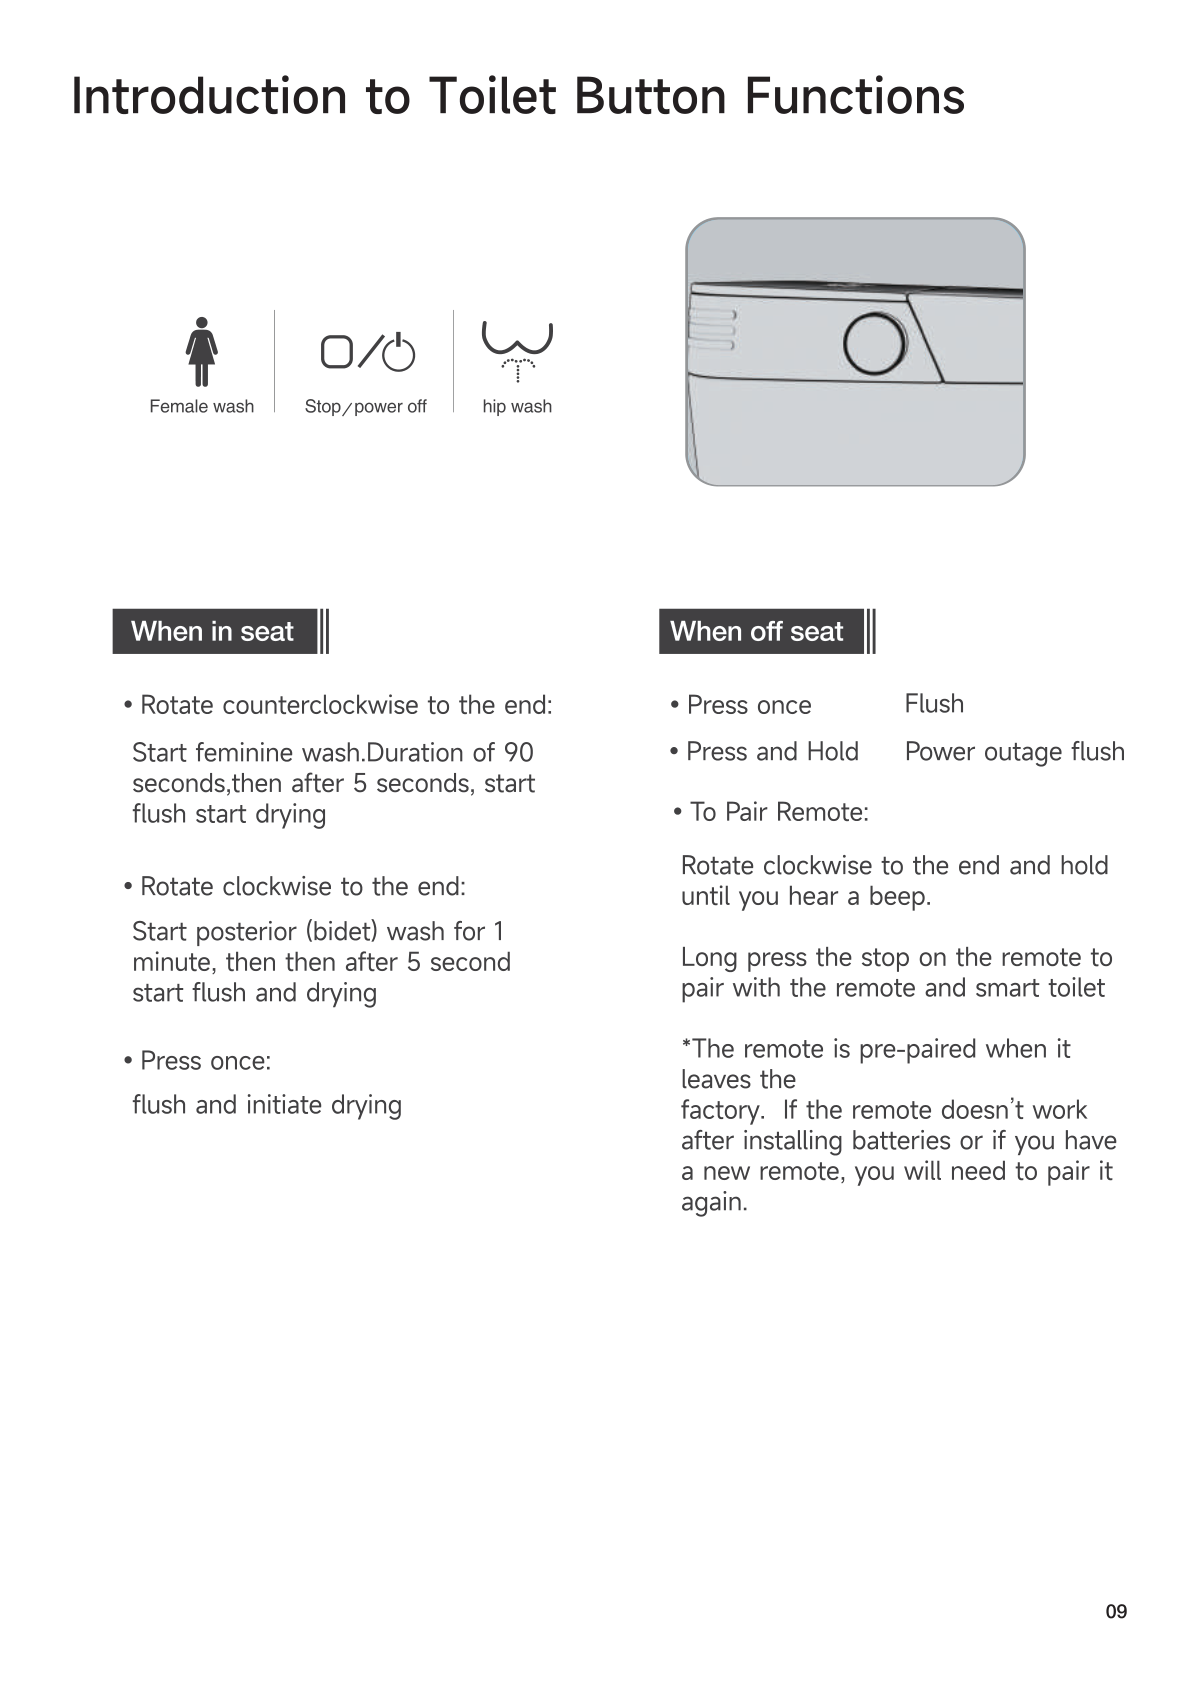
🔄 8. Side Knob Operations
| Action | When | Result |
|---|---|---|
| Rotate counterclockwise → end | Seated | Feminine (front) wash |
| Rotate clockwise → end | Seated | Rear (posterior) wash |
| Rotate same way again | During wash | Oscillating mode |
| Press once | Any time | Stop current function / flush |
| Long press | Seated | Warm air dryer |
| Long press 5 sec | Off-seat | Power off |
| Rotate CCW + hold | Off-seat | Enter pairing mode |
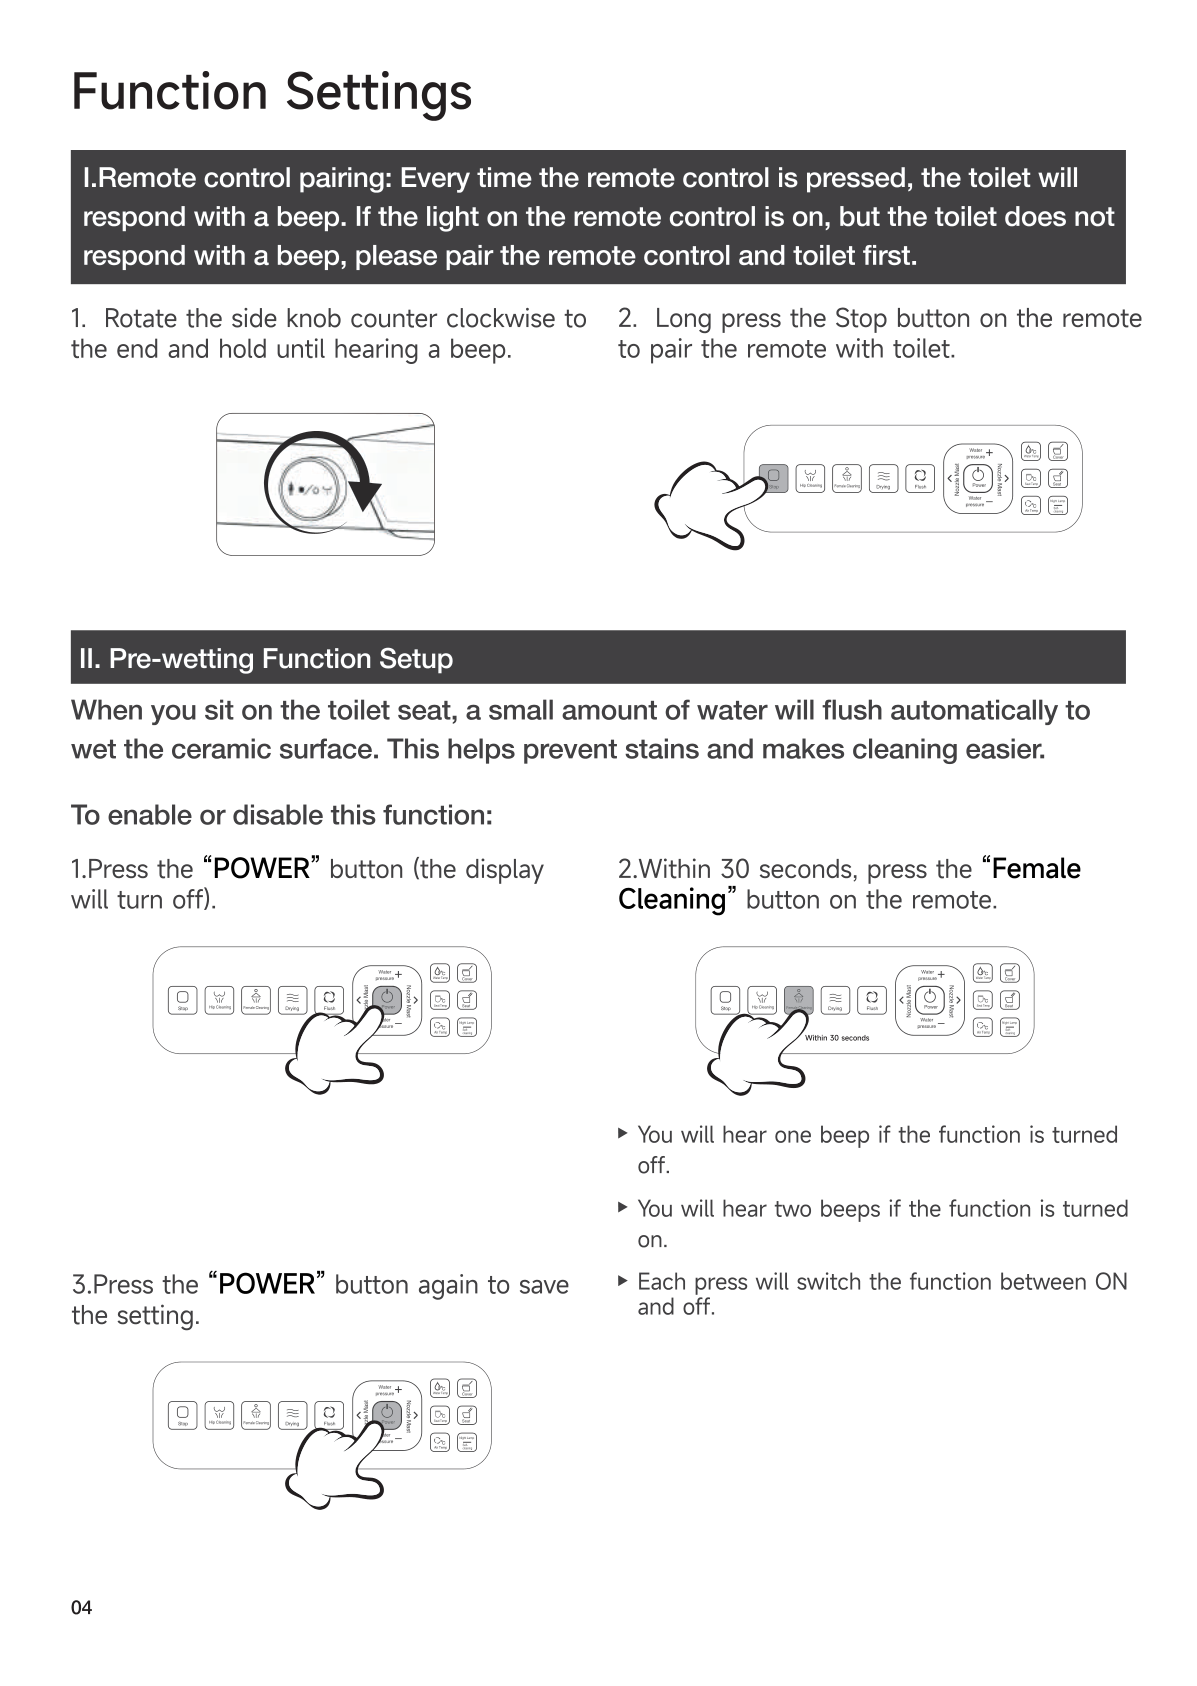
🔗 9. Remote Pairing
Remote is pre-paired. Re-pair if it stops responding.
- Rotate the side knob counterclockwise (toward front) + hold until beep.
- Keep holding knob, press Stop on remote.
- Confirmation beep = done.
⚠️ Use counterclockwise rotation (toward the front of the toilet), not clockwise.
🌡️ 10. Comfort Settings
| Setting | Range |
|---|---|
| Seat Temperature | OFF / 93°F / 99°F / 104°F |
| Water Temperature | OFF / 93°F / 99°F / 104°F |
| Air (Dryer) Temperature | OFF / 113°F / 122°F / 131°F |
| Water Pressure | 5 levels |
⚙️ 11. Advanced Settings (Hidden Menu)

Enter hidden menu: Press Power (display turns off) → Press function key → Adjust → Press Power to save.
| Setting | Key | Range |
|---|---|---|
| Factory Reset | Feminine Wash | Resets all |
| Auto Lid & Seat Sensor | Lid/Seat | 00=OFF, 01=ON |
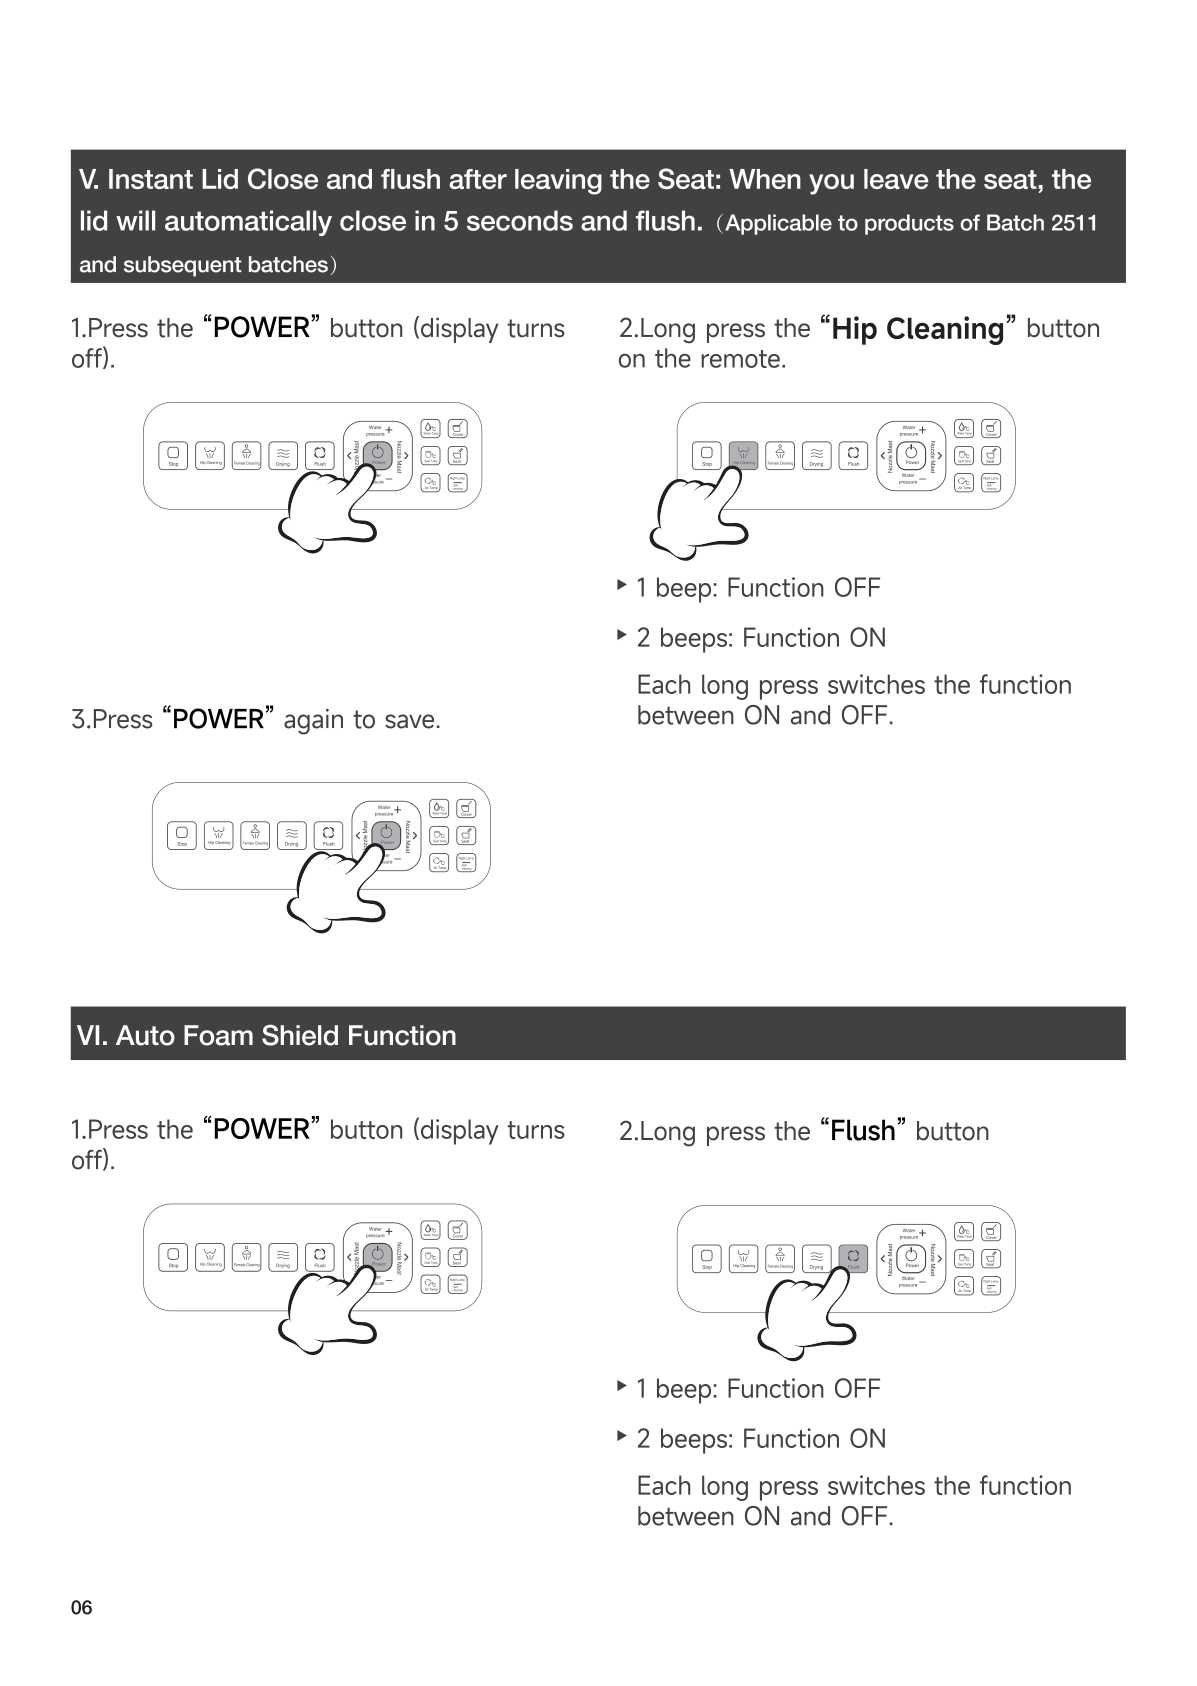
| Auto Foam Shield | Lid/Seat | 00=OFF, 01=ON |
| Auto Bowl Pre-Wetting | Water Temp | 00=OFF, 01=ON |
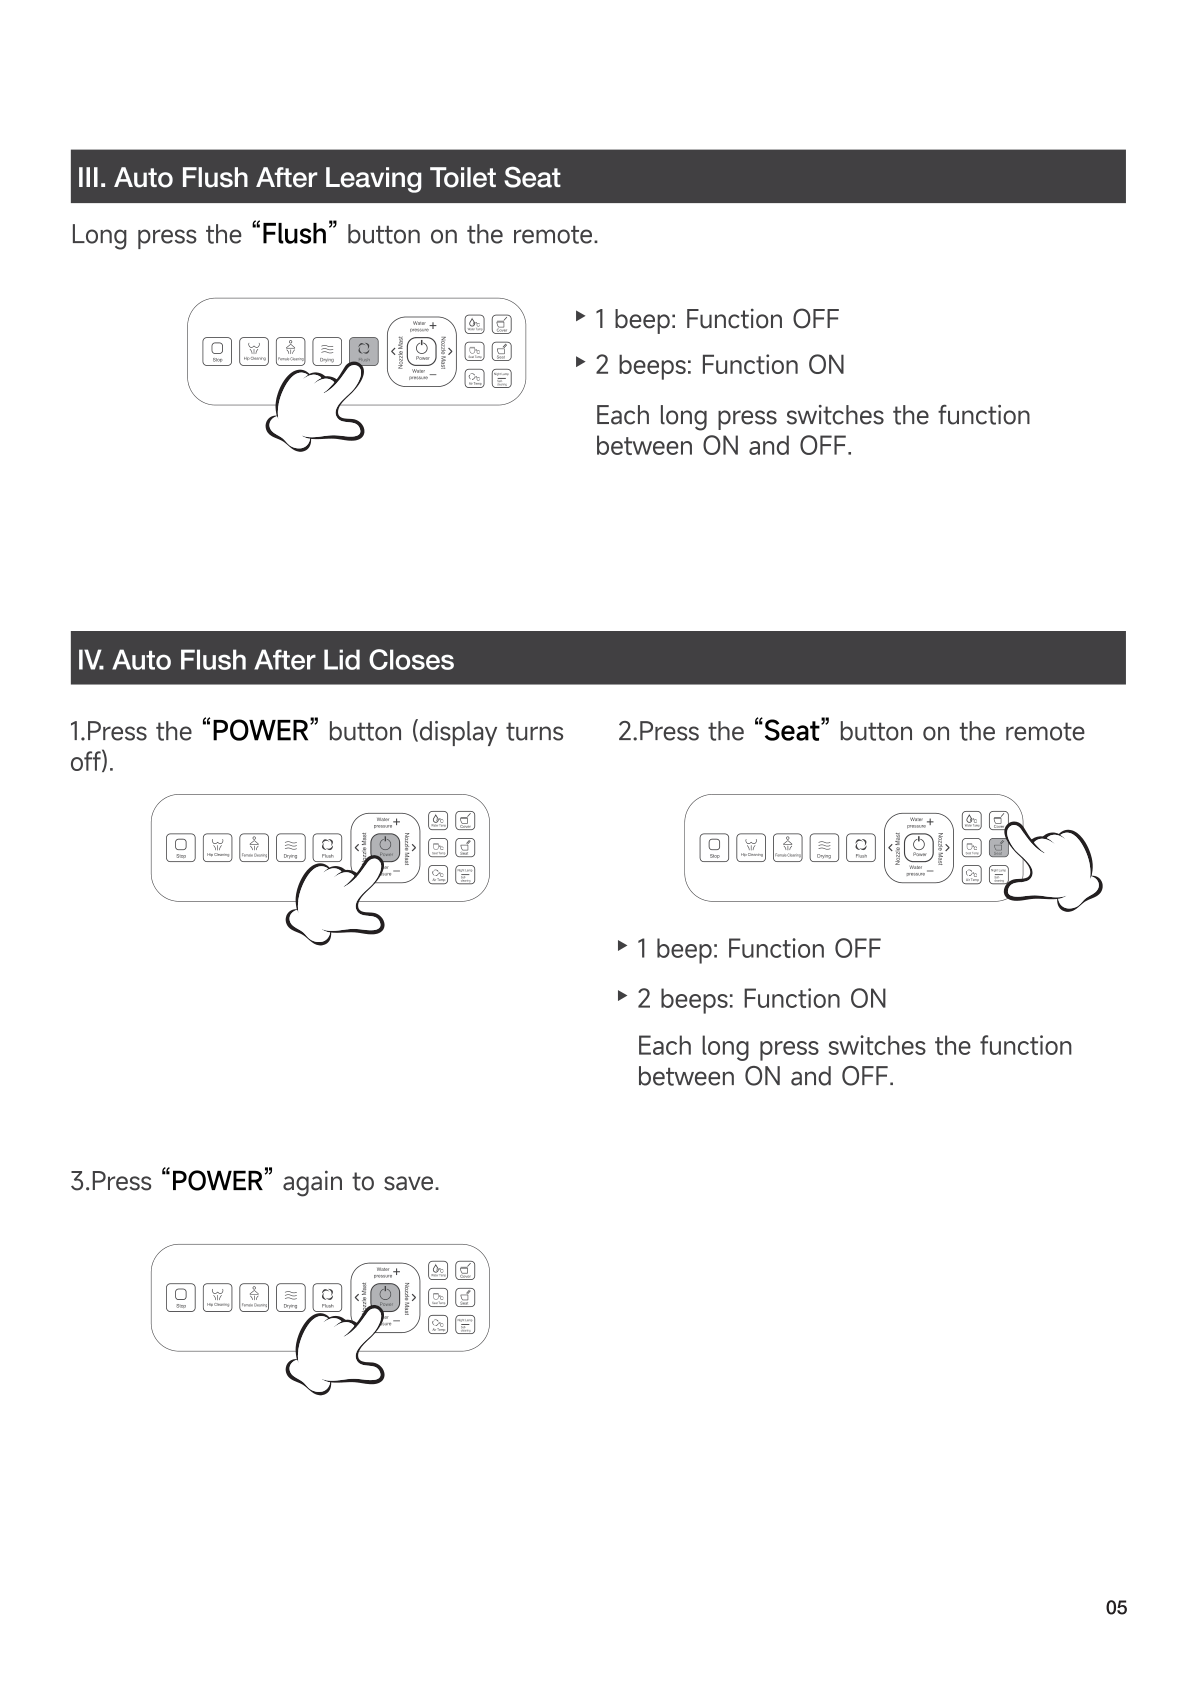
| Auto Flush (leave seat) | Full Flush | 00=OFF, 01=ON |
| Flush Power | Half Flush | Level 1-4 |
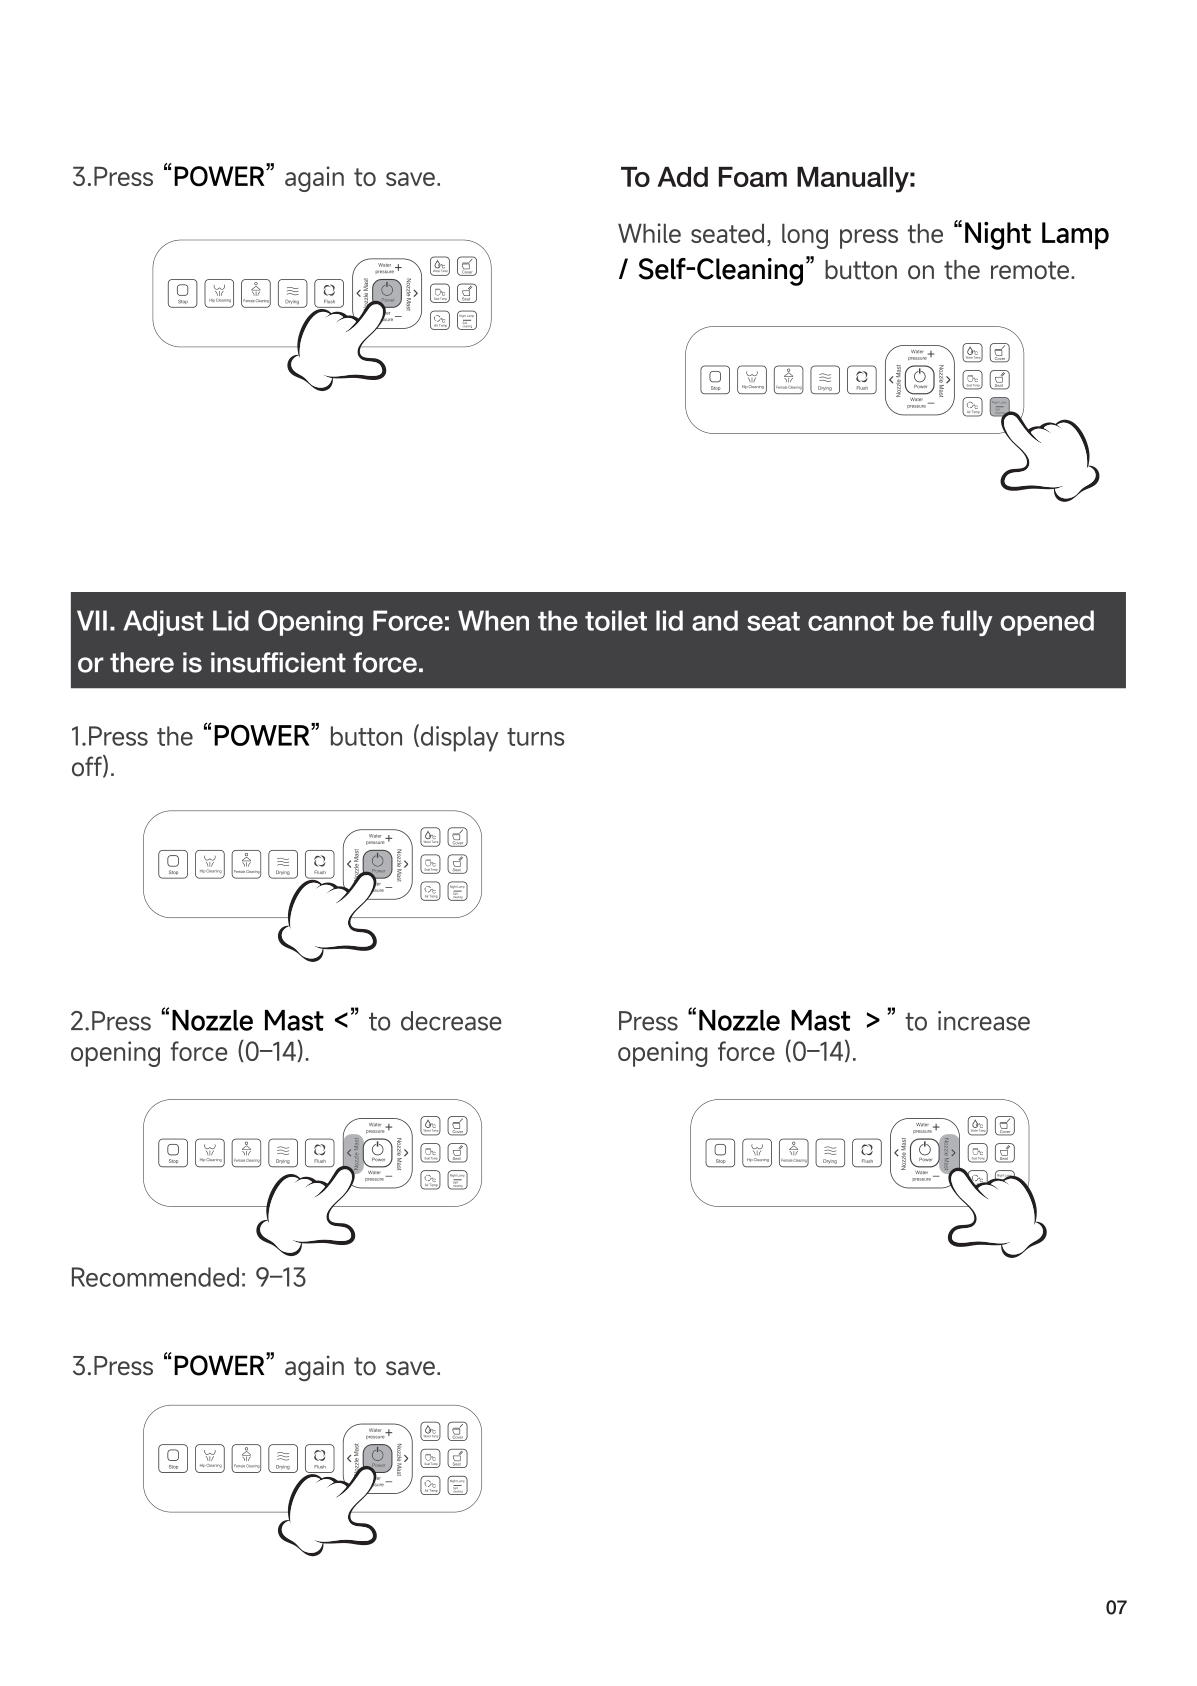
| Lid Opening Force | Child Wash | 1-14 (recommend 9-13) |
| Seat Opening Force | Nozzle Position ← → | 1-14 |
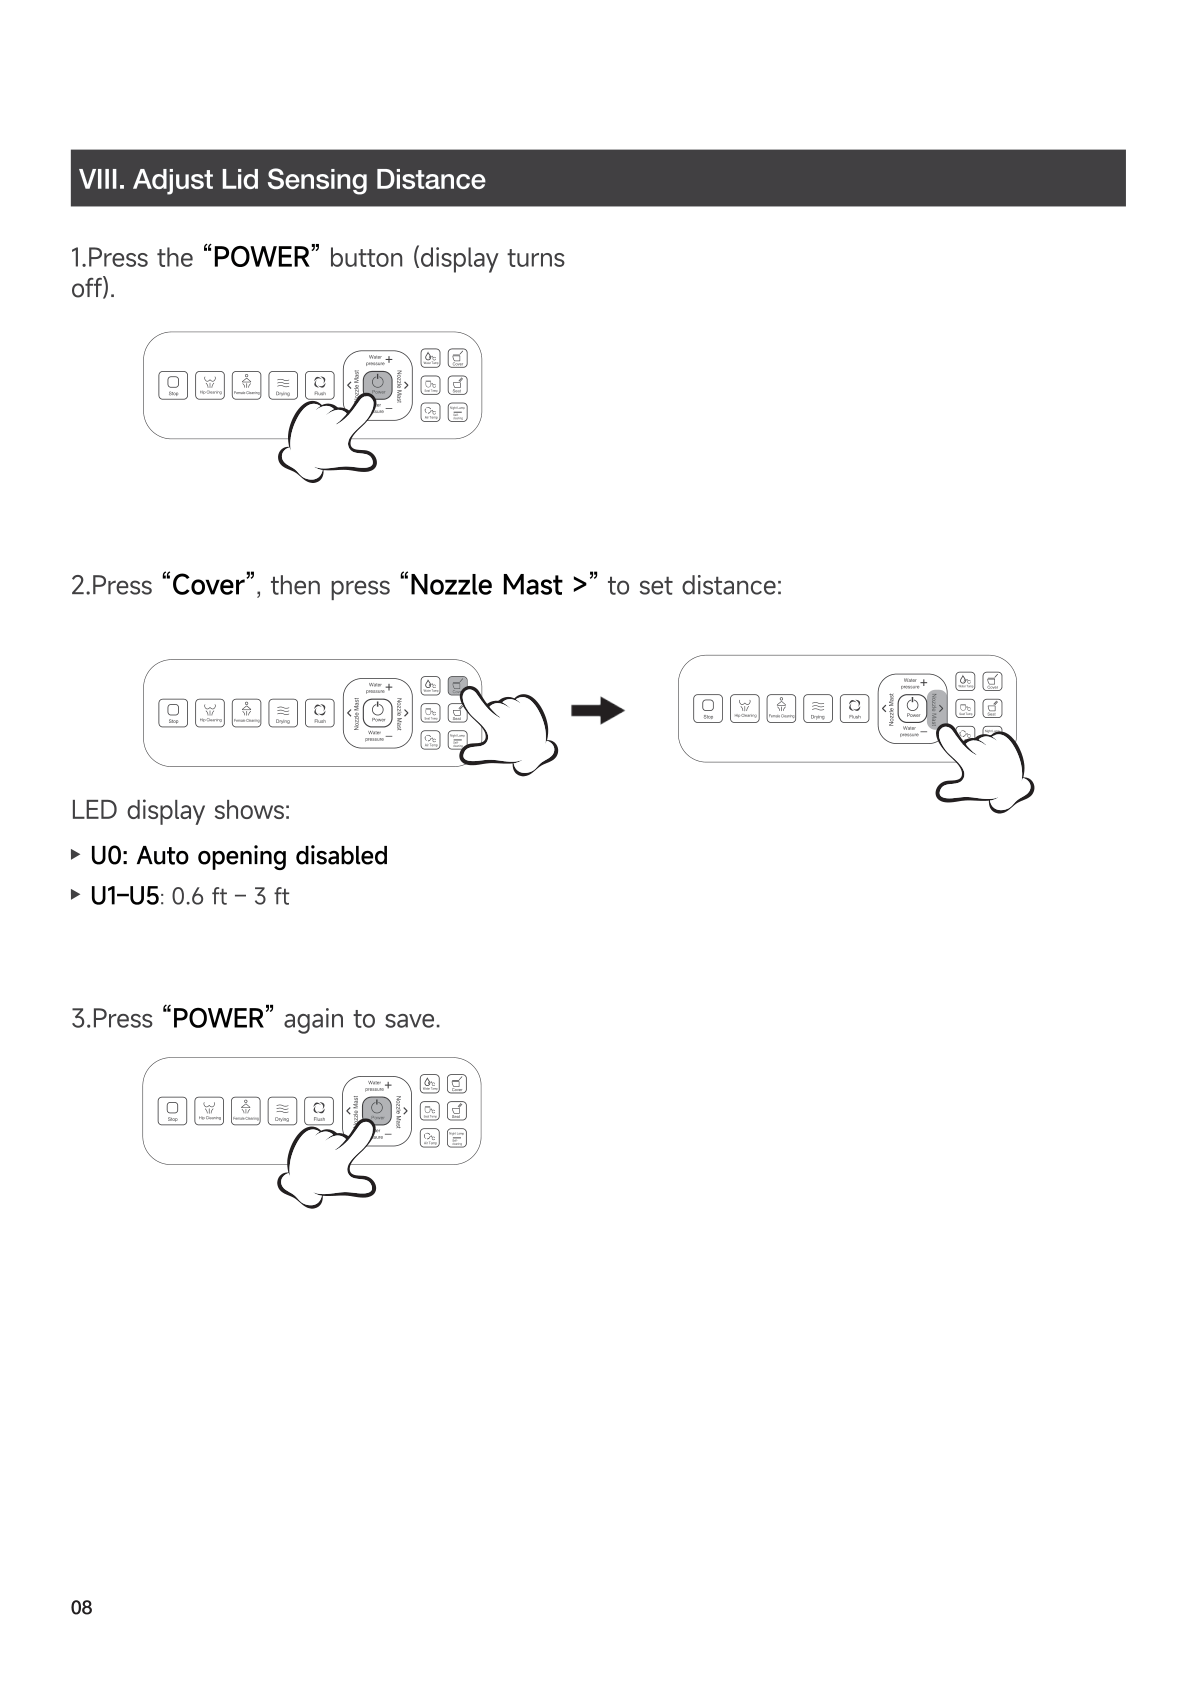
| Radar Distance | Seat Temp → Nozzle +/- | 1-4 (default 3) |
| Close & Flush | Long press Lid/Seat | 00=OFF, 01=ON |
| Quick Auto Close+Flush | Rear Wash | 00=OFF, 01=ON |
🔧 12. Troubleshooting
Remote Issues
| Problem | Solution |
|---|---|
| Remote not working | Check/replace batteries. Re-pair (Section 9). |
| Only Flush works, seat icon flashing | Wipe seat sensor dry with cloth. |
Water / Flush Issues
| Problem | Solution |
|---|---|
| E4 error / no water | Water not connected. Connect water, unplug 30s, retry. |
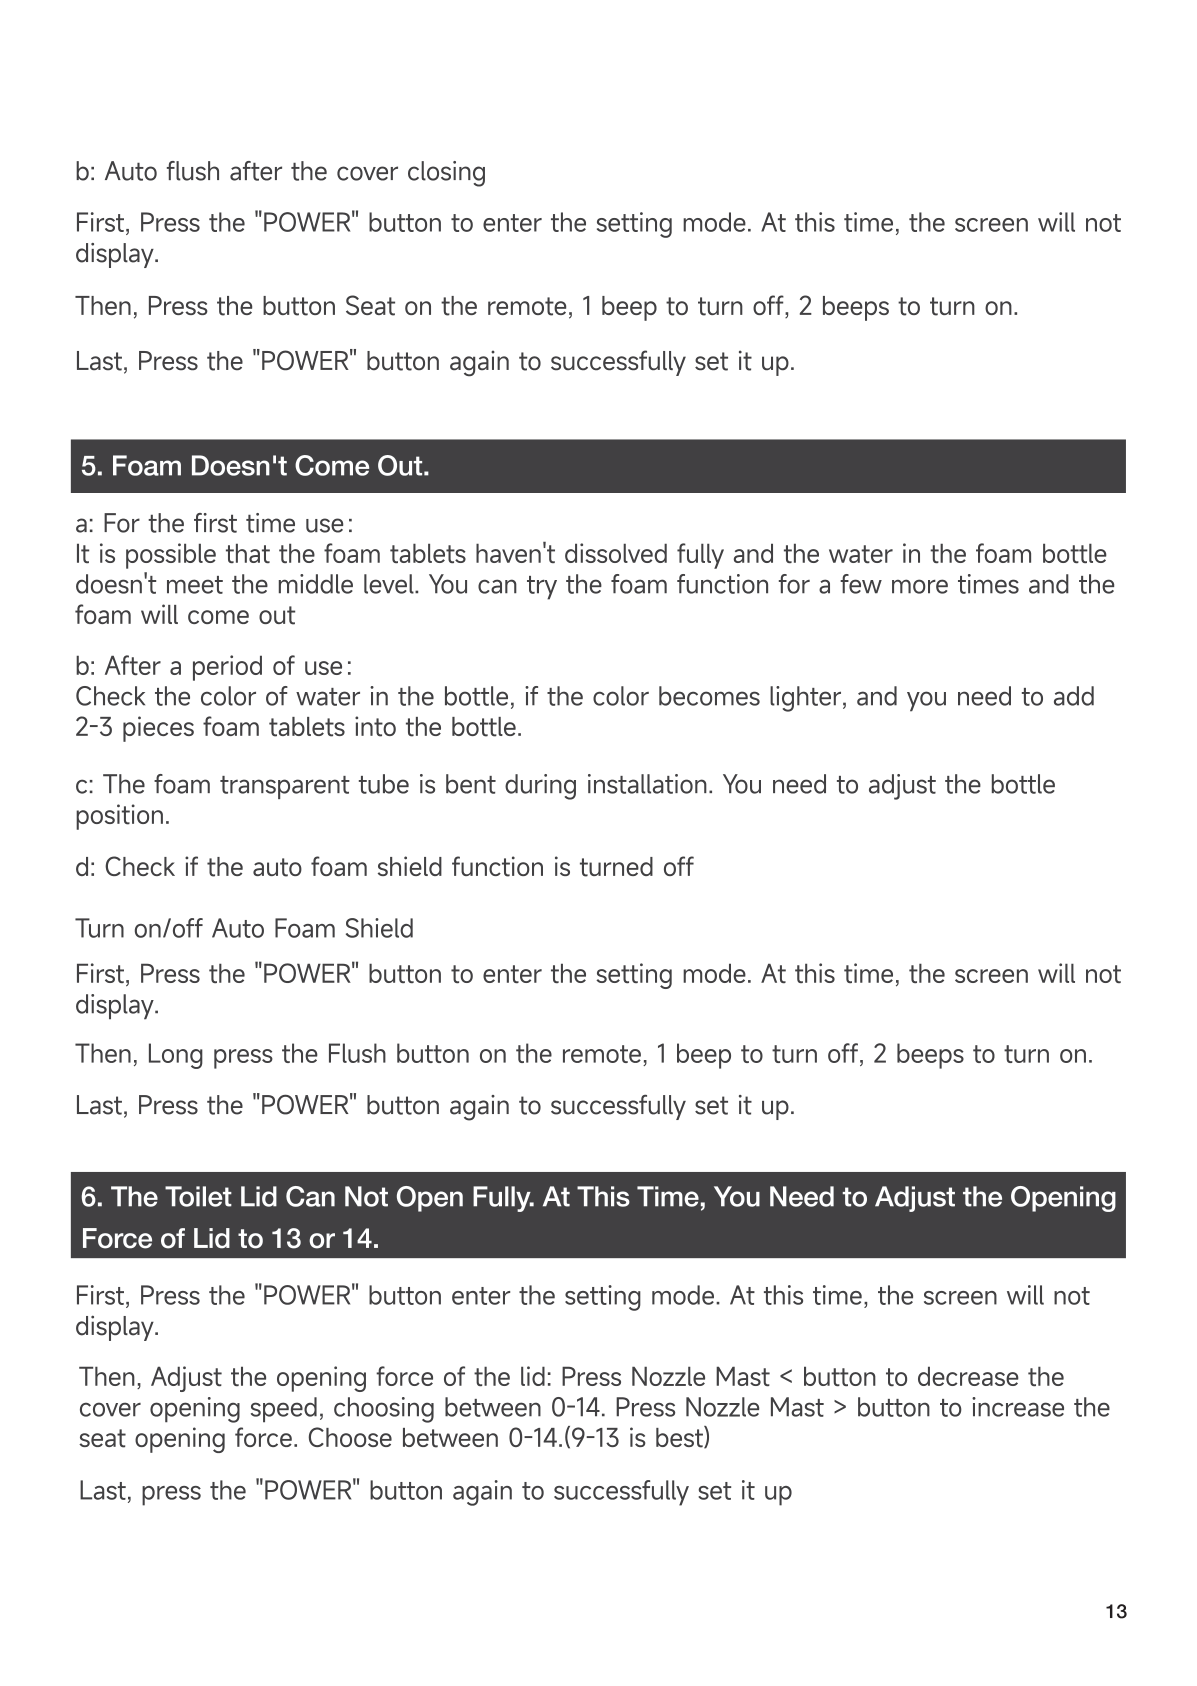
| Water sprays out | Adjust nozzle. Reduce water pressure at valve. |
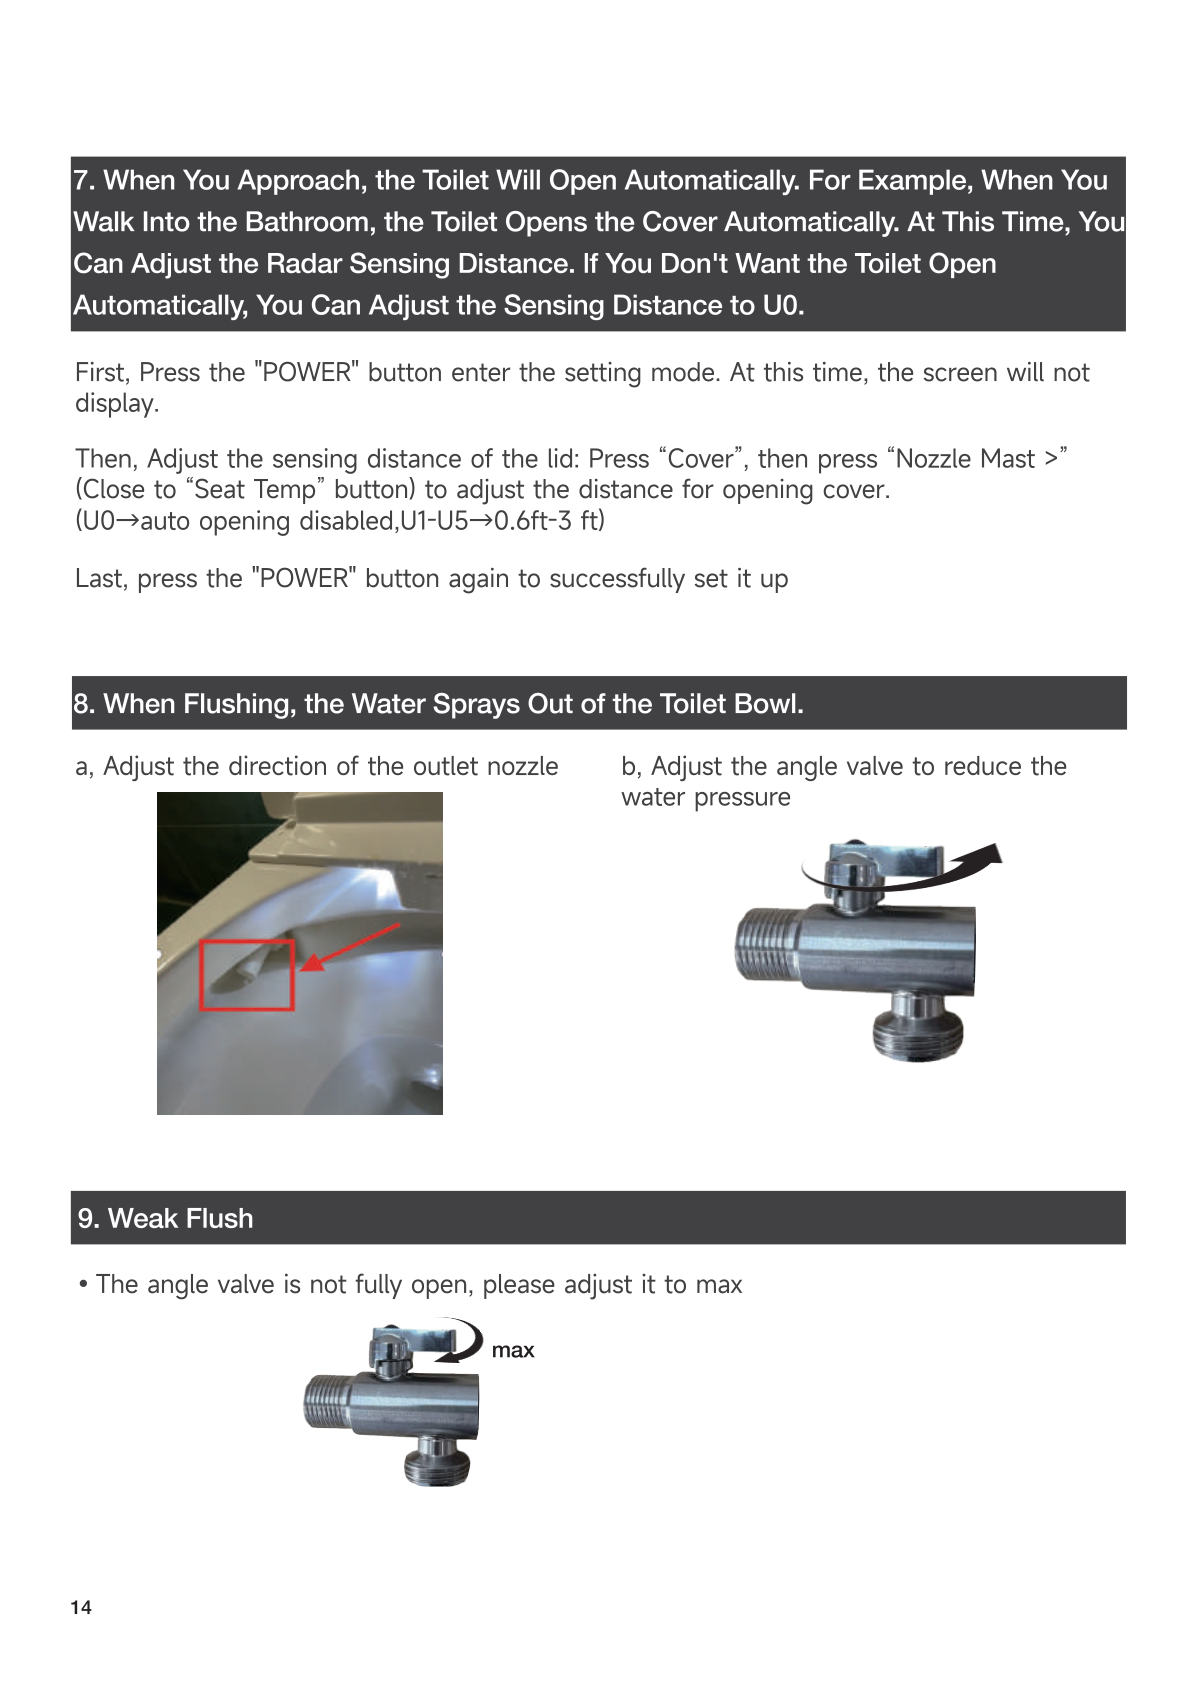
| Weak flush | Open valve fully. Clean filter. Check home water pressure. |
Foam Shield Issues
| Problem | Solution |
|---|---|
| No foam | Add tablets. Check tube isn’t kinked. Enable auto foam in settings. |
Lid / Reset
| Problem | Solution |
|---|---|
| Lid won’t open fully | Adjust force to 9-13 (Section 11). |
| Still having issues | Unplug 3 min, plug back in. Unit self-checks. |
| No siphon | Pour ~1.6 gal water into bowl to test. May need drain cleaning. |
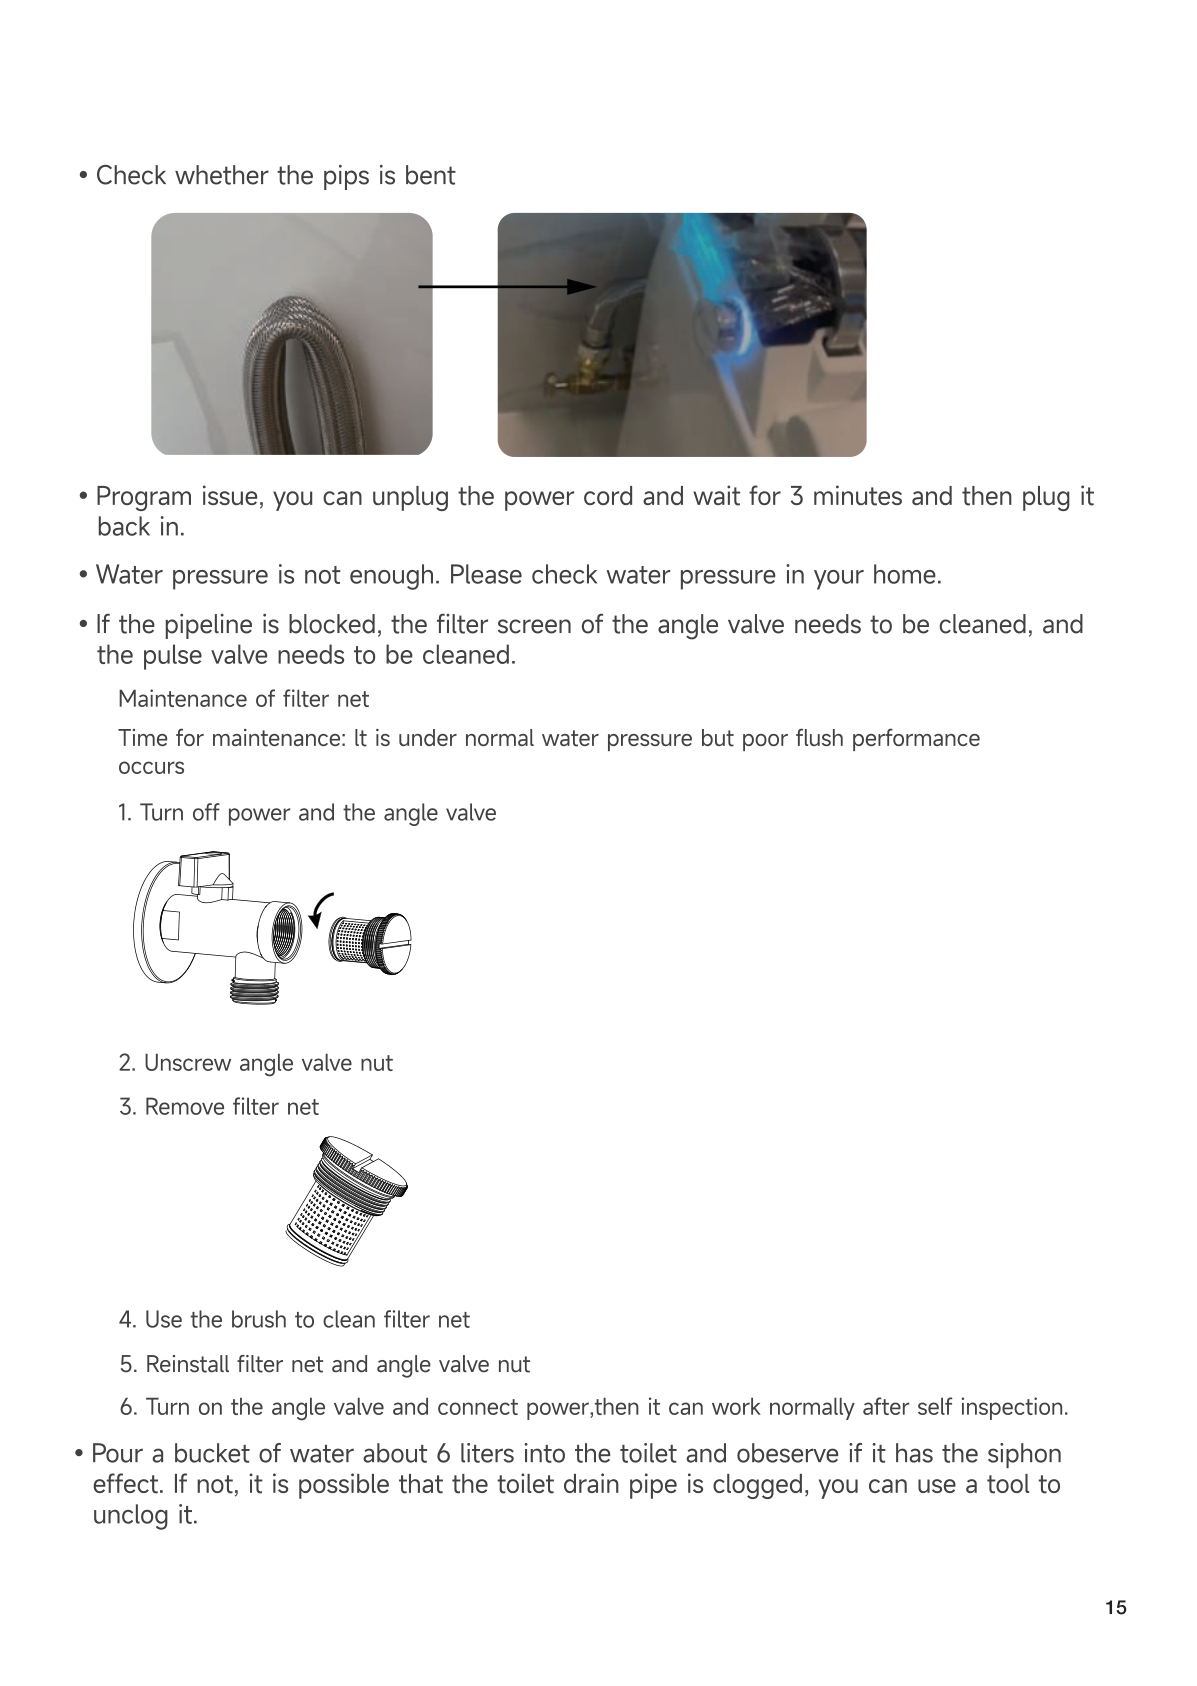
🧹 13. Maintenance — Cleaning the Filter
When: If flush performance drops but water pressure seems normal.
- Turn off power, close angle valve.
- Unscrew valve nut, remove filter screen.
- Clean with brush under running water.
- Reinstall, reopen valve, reconnect power.
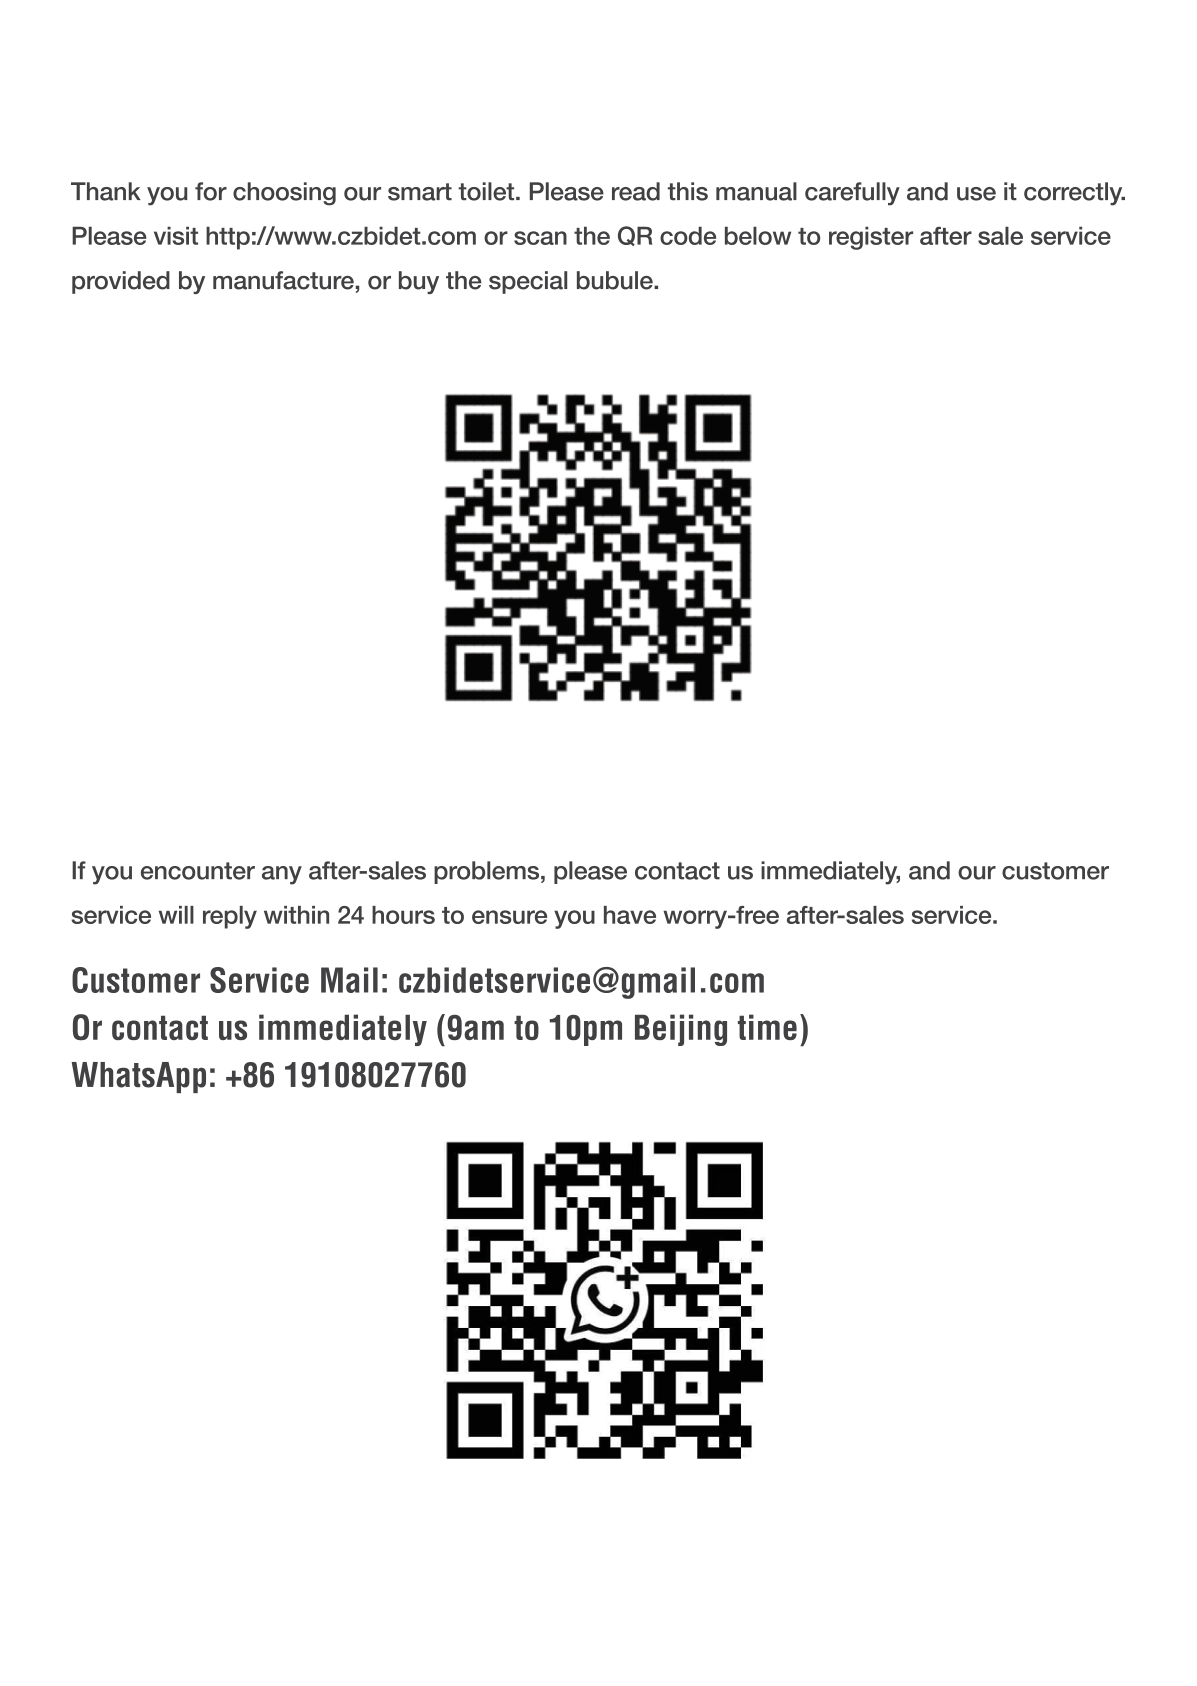
📞 14. Support & Warranty
- 🌐 www.e-sanitaryware.com
- 📧 service@e-sanitaryware.com
- 🕐 Mon–Fri, 9:00 AM – 6:00 PM (EST)
Register your product → for lifetime free replacement parts.


